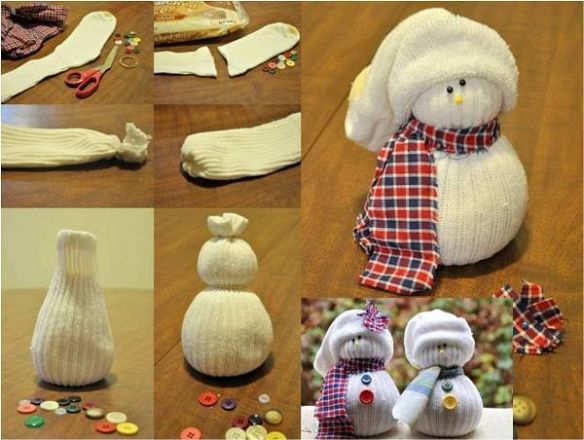
Here’s a fun craft idea for the holidays! I think I would make these as gifts for family members and customize each one a little bit. For my son… do a batman theme, for my husband maybe do a mountain climber theme etc.
Here’s the link to DarkroomAndDearly’s full article: DarkroomAndDearly: Christmas Sock Snowmen
Keeping the kids entertained over the holiday season can be a challenge for everyone. These sock snowman craft for kids ideas will keep your children entertained at least for a short while. Read this guide to find out how you can make these snowman crafts with your kids.
For this project you will need:
– Stuffing
– Baby Sock – black works best
– Fabric Glue
– Ladies size white ankle sock
– Cotton
– Orange craft foam
– Card
– Buttons or Sequins
– Ribbon in your choice of color
– Brown Felt
Step 1 – Stuffing the Sock
The first step is to stuff the ladies ankle sock. Before doing this cut a circle out of card and put it into the toe. Stuff the sock up to the heel of the sock.
Step 2 – Trimming the Sock
Tie the sock where you have stuffed up to. Then cut off the excess, try to cut as close to the knot as possible without allowing the knot to undo. The card base should allow the snowman to stand up.
Step 3 – Tying the Scarf
Take the ribbon that you are using for the scarf and tie it around the sock. Just let the sock pull in to form the neck of the snowman. This should create the head of the snowman.
Step 4 – Hat
Put the baby sock onto the top of the body of the snowman. This sock should stay in place by itself, but if not you could always use a small amount of fabric glue. This becomes the hat of your snowman and also hides the knot that you had to tie to keep the stuffing inside.
Step 5 – Finishing Touches
Cut a small triangle out of orange foam as the carrot for the nose and glue this in place. Glue buttons onto the front of the sock for eyes, and cut out twig arms from brown felt. Also glue a row of buttons down the front of the snowman.